Ultra Clear Image Enhancer for Sharper, Professional Photos
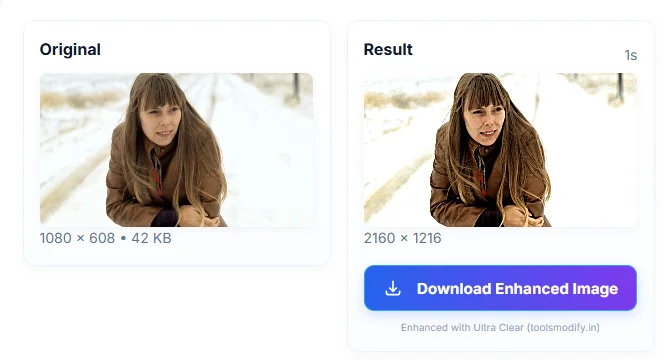
Ultra Clear image enhancer delivers professional-looking, sharper photos without complicated software. Using progressive upscaling, adaptive sharpening and tonal controls, Ultra Clear produces clean, high-quality images directly in the browser — fast, private and easy to use.
Ultra Clear — Image Enhancer
Advanced upscaling with sharpening and enhancement controls
Why Ultra Clear matters

Many photographs and product images lose clarity when scaled or captured on low-end devices. Ultra Clear image enhancer perceived detail and clarity using a controlled pipeline: progressive resizing to avoid interpolation artifacts, an adaptive unsharp mask to recover edge crispness, and targeted contrast/brightness adjustments to make images pop. The result looks natural and professional without external processing.
Key features of Ultra Clear image enhancer
• Progressive upscaling — multi-step resizing reduces artifacts and preserves smooth edges.
• Adaptive unsharp mask — sharpens detail while minimizing halo artifacts.
• Tonal controls — contrast and brightness adjustments after sharpening for precise finishing.
• Instant preview — side-by-side original vs result comparison.
• Drag & drop, simple sliders and presets for quick results.
• Privacy-first processing — images are transformed locally in the browser; nothing is uploaded.
• Download as high-quality PNG.
• Mobile-friendly with automatic safeguards for large images.
How to use Ultra Clear — step by step
- Open the tool page in any modern browser.
- Click the upload area or drag & drop a JPEG/PNG image — the original preview appears on the left.
- Choose a target upscale (start with 2× for balanced quality).
- Select progressive mode for better results; choose single-step for quicker, lower-resource runs.
- Adjust Sharpen Strength (start ~60–100), Contrast and Brightness to taste.
- Click Enhance & Generate and wait for the progress to complete.
- Compare the original and enhanced preview; click Download Result PNG to save.
Practical tips for best results
• Start at 2× upscaling — it’s the best balance of size and visual gain.
• Increase sharpen gradually; excessive sharpening creates unnatural halos.
• For noisy images, lower sharpening and apply gentle contrast.
• Use Max Dimension limits on phones to avoid memory issues.
• Prefer PNG if you plan further edits; JPG is acceptable for web thumbnails.
Technical notes (concise)
• Upscaling uses progressive, high-quality interpolation to reduce visible artifacts.
• Unsharp mask is computed by subtracting a blurred image from the original and adding a scaled difference back — adaptive radius reduces haloing around fine detail.
• Contrast and brightness adjustments are applied per pixel for consistent tonal results.
• Implementation leverages standard Canvas APIs and optimized processing loops — no plugins required.
Privacy and security
Ultra Clear image enhancer user privacy: all processing runs locally in the user’s browser, and no image data is sent to external servers. Users download the final image directly; nothing is stored or transmitted unless the user explicitly shares the file.
Also use our Background Blur Tool — Fast, Private & High-Res 100% Secured
Limitations and when to use advanced AI
• Ultra Clear enhances perceived clarity but does not synthesize new photographic detail the way deep-learning super-resolution (e.g., ESRGAN) can.
• For forensic restoration or heavy reconstruction, server-based AI models or desktop tools provide stronger detail hallucination but require model hosting and may affect privacy.
• This tool is optimized for single-image editing; batch processing at scale is better handled on a server.
Frequently Asked Questions (FAQs)
Q: Will my images ever leave my computer?
A: No. All processing takes place locally in the browser; nothing is uploaded automatically.
Q: Can Ultra Clear create new fine detail like AI super-resolution?
A: Ultra Clear improves sharpness, reduces interpolation artifacts and refines tonal balance. It does not invent entirely new photographic detail — for that, specialized AI models on powerful GPUs are required.
Q: Which upscale setting should I choose?
A: Start with 2× (balanced). Use 1.5× for subtle improvements and 3×–4× only if you need larger prints and your device can handle the memory load.
Q: What settings work best for portraits?
A: Use moderate sharpening (40–80) and gentle contrast to avoid harsh skin textures.
Q: Will large images crash my phone?
A: Very large images can exhaust mobile memory. Use the Max Dimension cap and choose lower scaling for mobile devices.
Q: What output format should I choose?
A: Use PNG for maximum fidelity and further editing; use JPG if file size is a concern.
Q: Is this free to use on my website?
A: Yes — the tool runs locally in visitors’ browsers. Hosting costs only cover the webpage itself; there are no per-use processing fees


Post Comment